


Chocolate Peanut Butter Rice Crispy Treats
These chocolate peanut butter rice crispy treats are a nostalgic, no-bake treat that's as easy as it is irresistible. With just a few pantry staples, you'll whip up a dessert that hits that perfect sweet spot between chewy, crispy, and rich. Whether you're making a quick weeknight treat or need something crowd-pleasing for a gathering, these bars never fail.

Karina's Notes
When I was pregnant, I had one craving my whole pregnancy: rice crispy treats. I would buy them in bulk and just munch on them ALL. THE. TIME. Needless to say, I consider myself a connoisseur of a good rice crispy treat now. So, you can believe me when I say that these Chocolate Peanut Butter Rice Crispies are exceptional. The secret is to melt the marshmallows with the peanut butter before you add in the rice crispies, and then add more into the chocolate topping for a peanut butter cup feel.

I'm a working mom, so when I'm making snacks for my daughter, I'm looking for two things: they are nourishing and they are easy to make, particularly in bulk. I wouldn't call this the most nourishing recipe I've ever made (It's a whole bag of marshmallows!), but adding peanut butter gives it a little protein. It's easy incredibly simple to make and definitely makes enough to feed a birthday party of two year olds if needed or just to have some now and freeze the rest for later- which I assume you can do but I have not because they are too good.
This is such a nostalgic treat for me, both from childhood and pregnancy, that I wanted to share it with you. I hope you enjoy!
For more easy, kid-approved snacks, don't miss my 3-Ingredient Banana Muffins: a perfect way to use up ripe bananas. If you're looking for something a little heartier, my Healthy Blender Muffins are naturally sweetened and made in just one step. Snack time gets fun with Matcha Puppy Chow or classic Regular Puppy Chow (both great for little hands to help shake up), and for an allergy-friendly option, try the DIY Nut-Free Trail Mix: perfect for lunchboxes or road trips.
Jump to:
Ingredients
- Butter
- Creamy peanut butter
- Mini marshmallows
- Rice Krispies cereal
- Semisweet or milk chocolate chips
See recipe card for quantities.
How to Make Chocolate Peanut Butter Rice Crispy Treats

Step 1: Prep and Melt
Grease a 9x13-inch baking dish or line it with parchment paper for easy removal.
In a large saucepan over medium heat, melt butter and peanut butter. .

Step 2: Add the Marshmellows
Stir in the marshmallows and continue stirring until fully melted and smooth.
Note: you can also microwave it. Add the ingredients in and microwave in 30 second burst, mixing in between microwave sessions

Step 3: Add the Cereal
Take the pan off the heat and stir in Rice Krispies until evenly coated.

Step 4: Press into pan
Use a greased spatula or wax paper to firmly press the mixture into your prepared dish.

Step 5: Make the topping
In a microwave-safe bowl, combine chocolate chips and peanut butter. Microwave in 30-second bursts, stirring in between, until smooth.
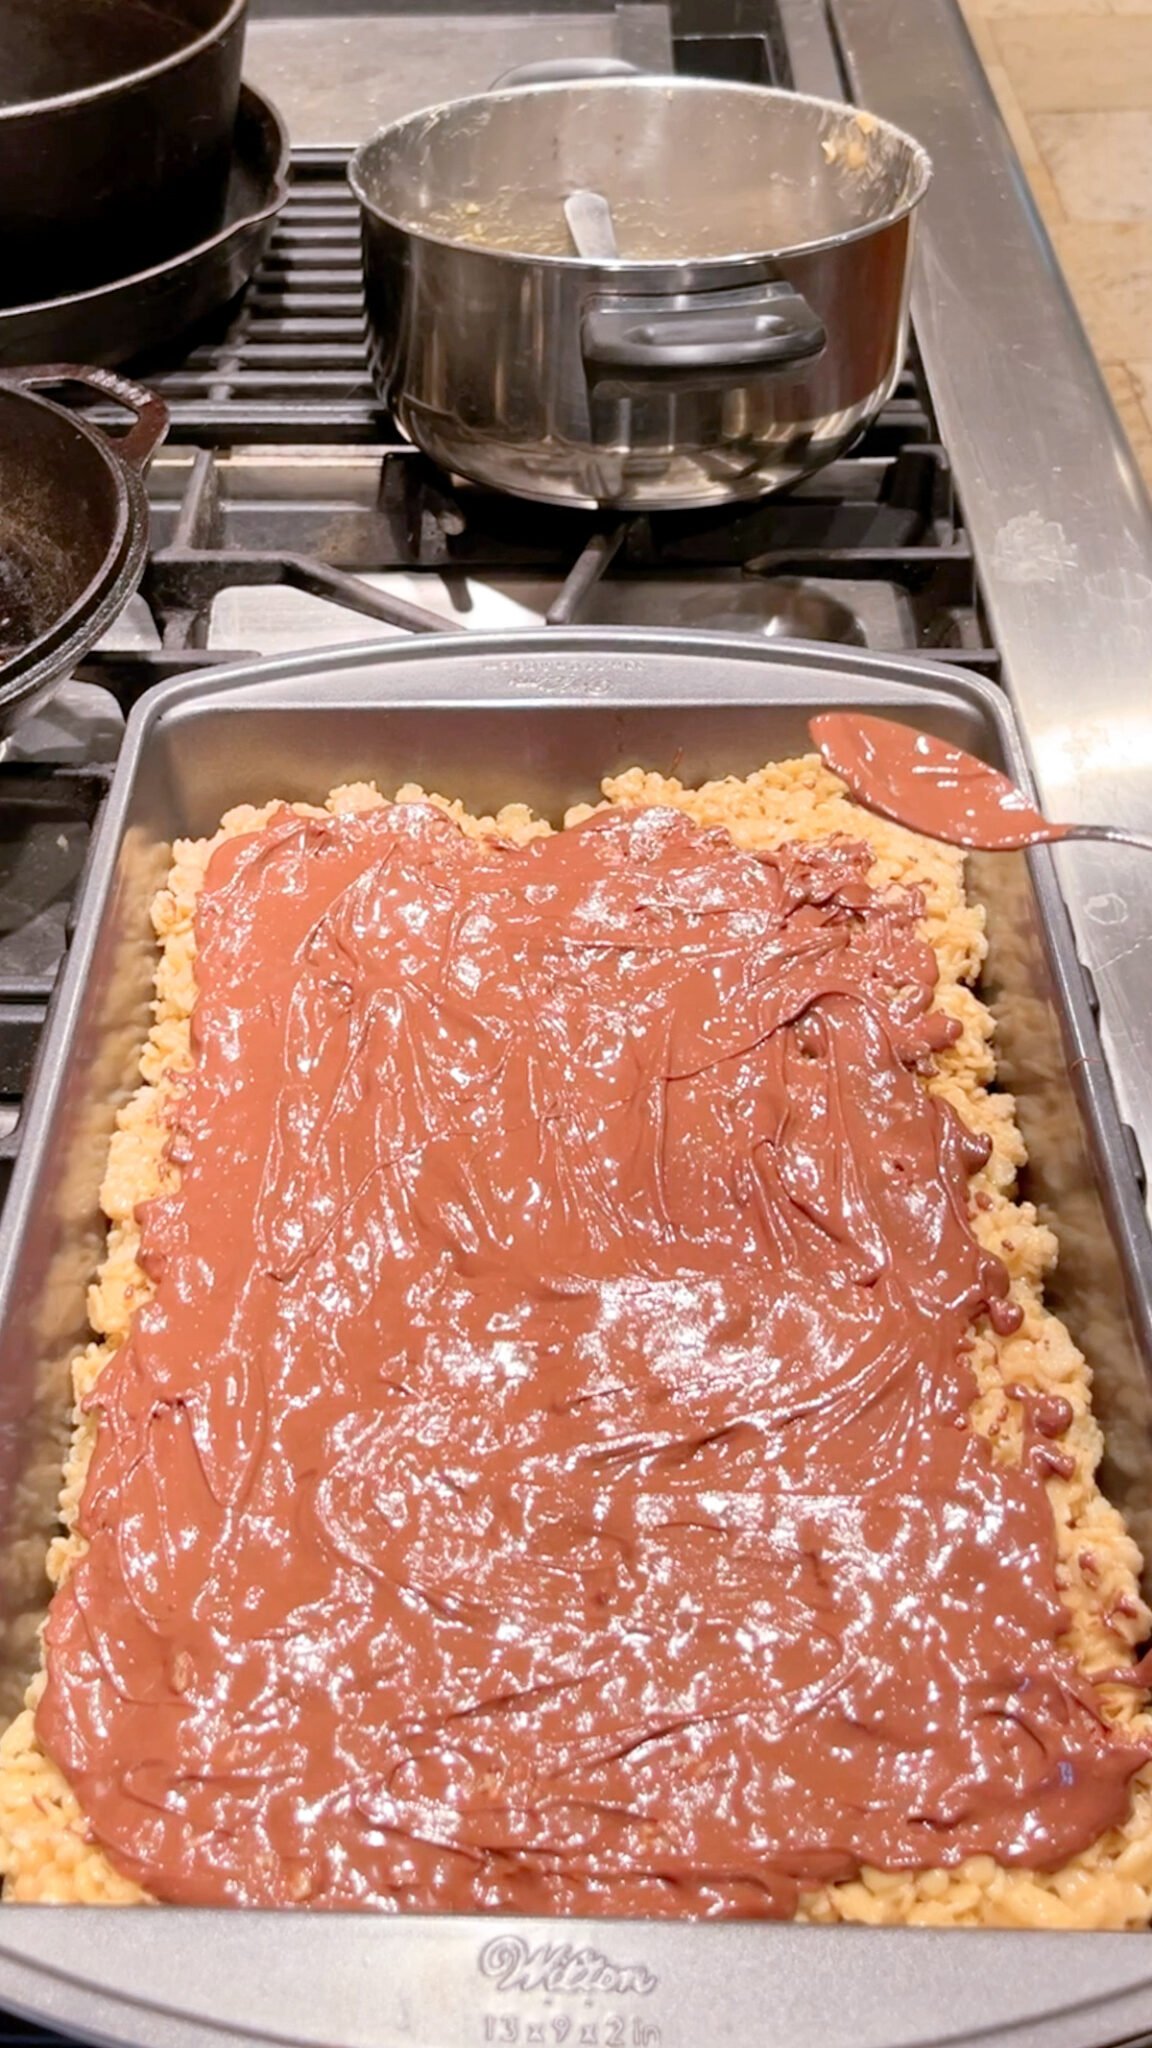
Step 6: Finish and chill
Pour the chocolate mixture over the bars and spread evenly. Let sit at room temp until set, or refrigerate for 30 minutes for a firmer top.
Cut into bars and enjoy!
Hint: Spray a silicone spatula or your hands with a little oil to make pressing the bars into the pan easier-no sticking!
FAQs
Yes! Just substitute the butter with coconut oil or a plant-based butter, and use dairy-free chocolate chips. Double-check your marshmallows too-some brands are not vegan or dairy-free.
The key is to melt the marshmallows on low heat and avoid overcooking them. Once mixed, press the mixture gently into the pan-don't pack it down too firmly. Store in an airtight container at room temperature to keep them soft and chewy.
You can! Slice them into bars, wrap individually in parchment paper, and freeze in an airtight container for up to 2 months. Let them come to room temperature before serving.
⭐ Top Tips
Let the chocolate topping cool and firm up completely before slicing-this helps the bars hold their shape cleanly and neatly.
Substitutions and Variations
Substitutions
- Peanut butter: Try almond or sunflower seed butter for a peanut-free version.
- Chocolate chips: Use dark chocolate for a richer topping or white chocolate for a twist.
- Butter: Swap with coconut oil for a dairy-free version.
Variations
- Cocoa twist: Use Cocoa Krispies instead of regular for a double chocolate hit.
- Add-ins: Stir in a handful of mini Reese's cups or chopped peanuts before pressing into the pan.
- Salted top: Sprinkle with flaky sea salt right after adding the chocolate for a gourmet finish.
Equipment
- Large saucepan
- 9x13-inch baking dish
- Spatula
- Microwave-safe bowl
Storage
Store bars in an airtight container at room temperature for up to 4 days, or in the fridge for up to a week if you like a firmer texture. I kept these at room temperature.
More Recipes
Looking for other snack recipes? Try these:


Recipe
Chocolate Peanut Butter Rice Krispie Bars
Ingredients
- 3 tablespoons butter
- 1 cup peanut butter
- 1 bag mini marshmallows (10 oz or about 4 cups)
- 5 ½ cups Rice Krispies cereal
- 1 cup chocolate chips
Instructions
- Grease a 9x13-inch pan with butter or line it with parchment paper.
- In a large pot over medium-low heat, melt the butter and peanut butter together.
- Add the marshmallows and stir until fully melted and smooth.
- Remove from heat and immediately stir in Rice Krispies until evenly coated.
- Using a greased spatula or clean hands, press the mixture firmly and evenly into the prepared pan. Let cool slightly.
- In a microwave-safe bowl, combine chocolate chips and peanut butter. Microwave in 30-second bursts, stirring between each, until melted and smooth.
- Pour the chocolate mixture over the bars and spread evenly. Let cool at room temperature or refrigerate for 30 minutes until set.
- Slice into bars and store in an airtight container at room temperature for up to 4 days (or in the fridge if you prefer them firmer).